Category Archives: Hardware
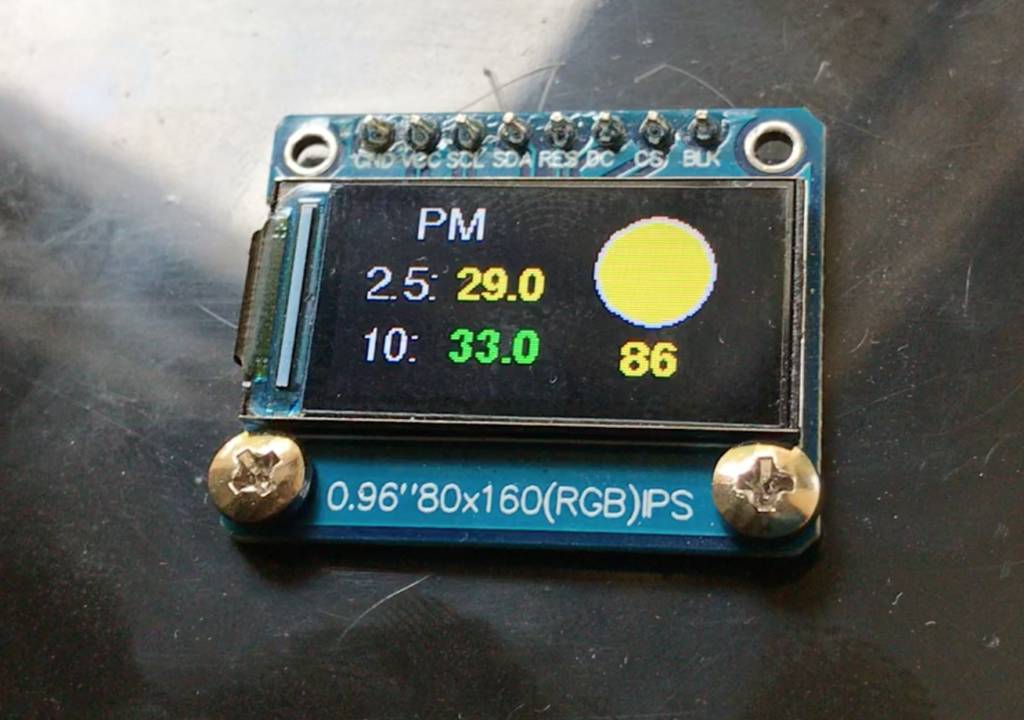
We’ve been having bad air in the Bay Area for a few weeks now and it got me wondering how much was seeping into my house and garage. After a little tinkering, I finished a custom, portable PM2.5 and PM10.0 sensor. The initial build used a SDS011, which promptly died after a week. I moved on to the “less” accurate PMS5003 and have been quite happy with the results. Here’s the sensor in action.
For a weekend project I built a backlight array for my TV which gives off ambient lighting according to what colors are being shown across the edges of the screen. Powered by a microduino and Abalight software for Mac.
According to the experts, backlights offset the brightness of the screen by lighting up the entire wall, while also giving the impression that the movie is bigger than just the screen. I just say “woot.”
I recently had an issue with a server hosted at OVH.com. One Saturday, it completely failed to boot and there was no SSH access. After a little pleading with OVH to fix the server(since I had no access) , I was flatly told “No” several times. This was a dedicated server and as such, I was responsible for all aspects of its software. “But your physical disks are failing to mount!” No help. Grrr, ok I can solve this.
Here’s the only problem, I don’t even know what the error is on boot! I can’t see any of the boot screen, so I don’t know where its failing.
OVH has a convenient feature know as Rescue Mode which allows you to boot to an alternative OS, so you can mount and correct any issues on the primary drive. Utilizing this feature I got access to the disks and RAID array. Everything seemed fine, but I ran through all the checks to be sure.
- Hard Disks – No errors
- Raid Array – Needed to be resynced, but does not fix boot
- FileSystem – OK
- Boot Logs – No help
- Partitions – Disks are out of order, but does not fix boot
At this point, I’m out of ideas, so I call OVH one more time and ask them to look at the boot screen and tell me where its stuck. They agree and tell me it boots to GRUB> prompt and stops. Ok, this is good information.
I log back into rescue and scour the internet for a way to fix this. The answer is found in an obscure ubuntu forum, which perfectly describes a way to reset the grub loader on each disk in the array, when utilizing a rescue mode.
$ sudo fdisk -l (From this you need to find the device name of your physical drive that won't boot, something like “/dev/sdxy″ - where x is the drive and y is the root partition. Since I was using a software RAID, root (/) was on md1)

$ sudo mount /dev/sdxy /mnt (Mount the root partition)

$ sudo mount --bind /dev /mnt/dev

$ sudo mount --bind /proc /mnt/proc

$ sudo mount --bind /sys /mnt/sys

$ sudo chroot /mnt  (This will change the root of executables to your your drive that won't boot)

$ grub-mkconfig -o /boot/grub/grub.cfg (insure that there are NO error messages)

$ grub-install /dev/sdx (NOTE that this is the drive and not the partition. try grub-install --recheck /dev/sdxy if it fails)

Ctrl+D (to exit out of chroot)

$ sudo umount /mnt/dev

$ sudo umount /mnt/proc

$ sudo umount /mnt/sys

$ sudo umount /mnt
Reboot!
Hopefully this will save someone some agony in the future and give you a few hours of your life back.
Originally posed to Instructables

I wanted to create a star ceiling, but since we are currently renting, I didn’t want to drill into the actual ceiling. So here’s how to create a portable star ceiling you can take with you. The total cost of this project is around USD $100
Step 1: Purchase fiber optic driver and cable


I purchased this 150 light set off of ebay for around $60. This one came with a remote control and 16 colors to choose from. In addition, it’s low profile driver will be perfect to fit in the frame.
Step 2: Purchase a poster board

I wanted something that was going to be sturdy enough to drill holes through, hold all the cables behind it, and look stylish. I came across this at Target for around $25.
Step 3: Remove the cardboard poster backing

I removed the plastic cover from the poster to leave just the cardboard frame.
Step 4: Paint it black

Next I grabbed some MATTE black spray paint and gave a good solid coating over the back of the poster board
Step 5: (Optional) Day time stars

I didn’t want my star ceiling to look like a solid black tile during the daytime, so using some white GLOSS spray paint I added some daytime stars. To do this, simply press down very gently on the top nozzle of the spray paint, till it sputters. It should look like it spitting. Then quickly aim it at your black background. It should only take a few spits to create the desired look
Step 6: Place the backboard in the frame

Step 7: Drill holes for starfeild

I highly recommend you drill holes where the daytime stars appear. This is because they will already have a very nice distribution across the entire surface of the board. I tried to make my own pattern instead and in looks very contrived instead of natural looking.
Step 8: Light shining through

Make sure all of your holes are clean and you patch up any unsightly looking spots on the front.
Step 9: Set your fiber optic driver foundation


Place your fiber optic driver in a place off to the side of the frame. Then secure with zip ties.
Step 10: Place fiber optic lights through pre-drilled holes


Grabbing groups of lights at a time, start running the cables through your holes. You’ll want to keep these group somewhat organized, so I used more zip-ties. The group simply helps you lay the cables flat as you prepare to mount to ceiling. Don’t worry about the cables peaking through the front, we’ll trim those back later.
Step 11: Glue it good

Once you’ve got all of your cables placed in the holes, you can start gluing to keep them in place. I used Elmers Clear Glue liberally on every singly hole.
Step 12: Allow 12 hours for glue to dry

Step 13: Trim back the ends


After the glue has dried, you’ll have a lot of cables sticking through the front. I used fingernail clippers to trim these flush with the board.
Step 14: Mount it


That’s pretty much it for building the star panel. Now you can mount the panel in way you light and enjoy your new star field!

